CHAPTER 02 / 06
Chapter 2: A mushroom with a front door
The Worm Farm farmer has found a mushroom. Unfortunately it is solid inside. Very good mushroom; very bad house.
Last chapter we added material with union. Now we remove a room and doorway with difference, then make a separate roof that lifts off.
Start with the outside
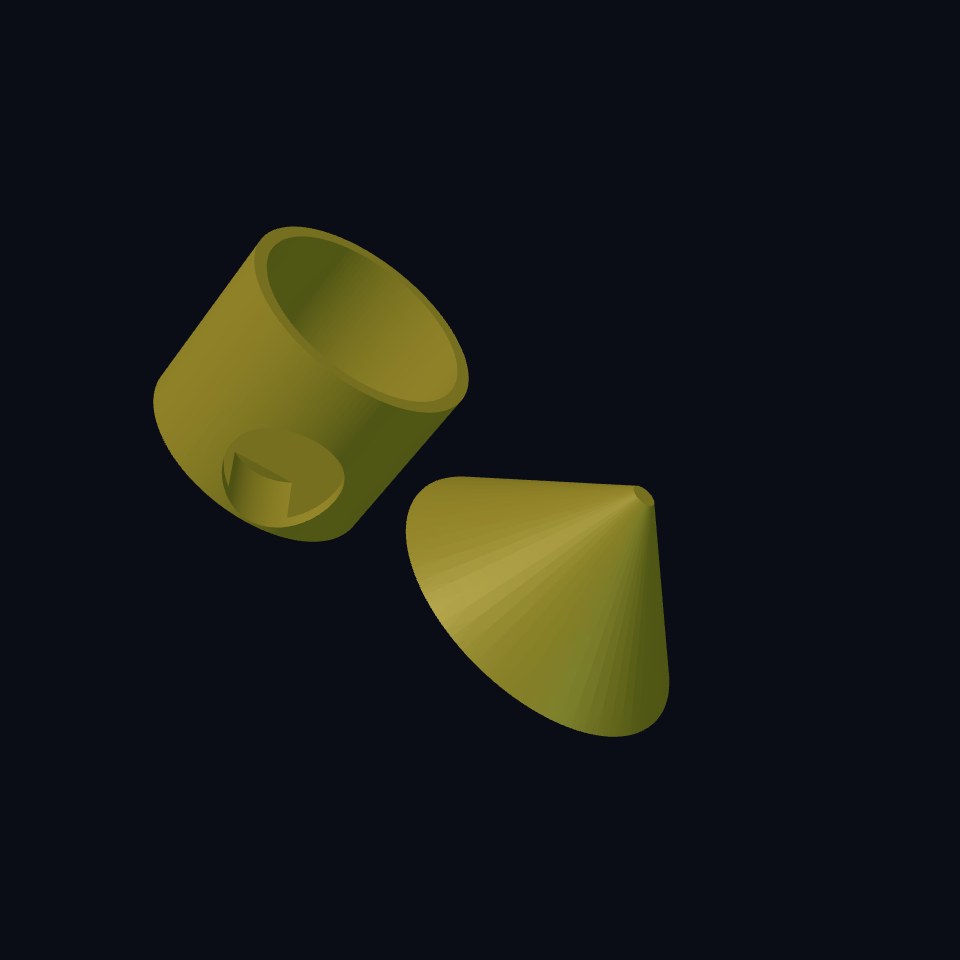
(cylinder 18mm 28mm) makes a round house 36 mm across and 28 mm tall. Remember: the first number is a radius, so double it to get the width. Its bottom sits at Z = 0.
For the roof, (cone 26mm 2mm 26mm) narrows from a wide bottom to a small top over 26 mm of height. Both round shapes take dimensions, not a “number of sides.”
Scoop out a room
Imagine pressing a smaller cylinder into the big one, then removing everything it touches. That smaller shape is a cutter. Put the house first and its cutters after it:
(difference outside room doorway)wall starts at 2 mm. The room radius is 18 - wall, or 16 mm. Its bottom starts 2 mm above the bed, leaving a floor. The room cutter ends at Z = 29, above the 28 mm house, so the top opens completely.
The doorway cutter is a cylinder turned sideways, just as we turned the rake's bar. It cuts the front wall and reaches the room. It stops before the back wall, so we get one door.
A cutter disappears after subtraction. Do not export it as another part, or you would fill the room again.
Reference: difference.
Make a roof that lifts off
part house and part roof keep the two pieces separate. The roof is hollow too: a short round opening makes its rim, and a cone scoops out the space above it. Its sloped inner surface rises at 45 degrees. Its wide, flat rim rests on the bed for printing.
The roof fits over the outside of the house. Its opening radius is 18 + roof_clearance, or 18.3 mm. That leaves 0.3 mm per side around the 18 mm wall. Changing wall changes the room; changing roof_clearance changes this fit.
house_print_layout starts on, placing the roof beside the house on the bed. Turn it off to inspect the roof over the house. This changes export positions too; return to print layout before exporting the two pieces. The assembled placement shows the nominal skirt position; the sloped inside seats on the rim when printed.
Build the house
(model
  (params
    (number wall 2mm :label "House wall" :min 1.5 :max 3 :step 0.5)
    (number roof_clearance 0.3mm :label "Roof clearance" :min 0.2 :max 0.6 :step 0.1)
    (toggle house_print_layout true :label "House print layout (changes export)"))
  (part house
    (let* ((outside (cylinder 18mm 28mm))
           (room (translate 0 0 2mm (cylinder (- 18mm wall) 27mm)))
           (doorway (translate 0 -16mm 9mm
             (rotate 90deg 0 0 (cylinder 8.5mm 18mm :align '(center center center))))))
      (difference outside room doorway)))
  (part roof
    (let* ((rim-radius (+ 18mm roof_clearance))
           (skirt-height 3mm)
           (cap (cone 26mm 2mm 26mm))
           (rim-opening (translate 0 0 -1mm (cylinder rim-radius (+ skirt-height 1mm))))
           (inside (translate 0 0 skirt-height (cone rim-radius 0mm rim-radius))))
      (translate (if house_print_layout 52mm 0mm) 0 (if house_print_layout 0mm 25mm)
        (difference cap rim-opening inside))))
  (verify
    (tag separate-house-and-roof)
    (metric pieces (stl connected-component-count))
    (expect pieces (= 2))))
Download the mushroom house and roof
Try, predict, inspect
- Set
wallto 3. Predict: the outside stays the same, but the room gets smaller. The roof opening stays the same. - Look through the doorway. Find the floor and the open top.
- Increase
roof_clearanceto 0.5. Predict: more room around the wall, with the house unchanged. - Make a deliberate mistake: move the room cutter's bottom from Z = 2 to Z = 8. The model can still render, but the floor becomes much thicker. Restore 2 mm.
Run verification and expect two pieces. Print a small rim sample before choosing a final roof fit; a numerical gap does not guarantee your printer's fit.
You can now: remove a cavity, cut a doorway, preserve a floor, and leave a named gap between separate pieces. Next, repeat a reusable fence post.